Fishing The Fly Scotland Forum

Mike Barrio

Please post your December step by step fly tying competition entries in this thread  :z16

For details about this competition, please see http://www.fishingthefly.co.uk/forum/index.php?topic=2293.0

Best wishes
Mike Barrio

Matt Henderson

Re: December "step by step" fly tying competition entries
« Reply #1 on: 06/12/2009 at 22:07 »
Since nobody has entered yet I can only assume that everybody else is busy perfecting their photography and descriptions for this month.

Hook: size twelve nymph style hook
Back of the fly:3/8" scud back sort of charcoal in colour
Underbody: fine lead wire
Main body: hares ear dubbing
Thorax:eumer spectra dubbing peacock green
one dark brown sharpie
Rib: fine copper wire and 3lb nylon
thread 17/0 uni white

Fix the hook in the vice and run the thread down past the bend to where it becomes vertical


Tie in a length of scub back I don't bother to cut it at this point to avoid wasting some material needlessly


Wrap the body in lead wire and coat it with some zap a gap and then cover it in the tying thread going up and down as many times as is necessary until there is a good layer of thread covering the wire


Tie in some fine copper wire and some 3lb nylon which will form the rib


Dub the body with the hares ear dubbing up to the point where the head of the "bug" should be


Dub the remainder of the hook with the eumer spectra peacock green dubbing


Wind the copper wire up the body in even turns


Pull the sucb back over the hook and secure it at the eye with some tight turns of the tying thread


Wind the nylon up the hook in even turns in the same direction and spacing that you used for the copper wire, secure it with the tying thread


Trim off the excess scub back and nylon and pick out the body with a dubbing needle or an old toothbrush. 


Using your dark brown sharpie colour in the section of scud back that covers the dark dubbing and also any tying thread.  Then give the scud back a coat of varnish to fix the nylon in place.  Et Voila!


good luck.

Matt  :z18

Barry Robertson

Re: December "step by step" fly tying competition entries
« Reply #2 on: 06/12/2009 at 22:09 »
A nice wee flee to start the ball rolling Matt, good effort  :z18

Mike Barrio

Re: December "step by step" fly tying competition entries
« Reply #3 on: 06/12/2009 at 22:23 »
Nice one Matt ......... Thanks for posting :z16

Best wishes
Mike

Sandy Nelson

Re: December "step by step" fly tying competition entries
« Reply #4 on: 09/12/2009 at 01:11 »
After weeks of playing around, i have finally simplified the Shrimp :z18 May be a good salmon fly as well as a Saltwater one.

So here goes

Hook: Size 4 Mustad 34007 style circle
Thread: Fine clear Monofilament
Fibres: DnA Holofusion in cream or pink or white or any colour you like, purple and orange might be good for salmon :z8
Eyes: Xtra small dumbells
Finish: Z-poxy

Step 1. start winding on the mono


Step 2. Tie in the dumbell eyes opposite the hook point on the top of the shank, secure with figure of 8 turns.


Step 3. Select a length of DnA approx 4" long


Step 4. Tie the tail (head) just behind the dumbells (secure with 3-4 turns of mono)


Step 5. Fold the fibres back over the dumbells and secure in front .


Step 6. Whip down fibres up to the eye of the hook


Step 7. Invert hook and trim Tail (head)


Step 8. Separate the fibres into two bunches


Step 9. Tie bunches along underside of hook and either side of the hook point


Step 10. Tie down bunches behind dumbells with 3-4 turns of mono making sure they flare either side of the bend .


Step 11. Wrap thread back up the shank to even the body up and whip finish on body


Step 12. Apply epoxy resin and let turn on fly dryer. Finished fly should have a tapered body with the bulk around the eyes. Trim the two bunches so they look right,  a bit longer than the tail, but only by 1/2"
try to keep the ends irregular :z16


Another picture of the finished fly showing profile and sparkle from DnA body under epoxy


All in all a very easy and quick fly to tie. Should be good for all kinds of fish.
Will get a proper test next week in Perth :z16

Sandy

Matt Henderson

Re: December "step by step" fly tying competition entries
« Reply #5 on: 09/12/2009 at 07:17 »
that is amazing!

Rob Brownfield

Re: December "step by step" fly tying competition entries
« Reply #6 on: 09/12/2009 at 08:25 »
Sandy,
That Holofusion is nice stuff huh? I tie a shortened Clouser Minnow with Tan Holo which I was trying to get to look like a shrimp, hence the "shortened" bit, but I will deffinately give your patten a try. Much more what I am after!

Thanks for the tying

Caught anything on it yet, and if so, what? I would fancy that in the mouth of the Belait for Catfish..live shrimp was a great bait for them :)

Mike Barrio

Re: December "step by step" fly tying competition entries
« Reply #7 on: 09/12/2009 at 08:50 »
Hi Sandy :z16

Excellent step by step and the shrimp looks a real fish catcher :wink

"Keep it simple" ........ works every time, doesn't it?

I like the look of that vice :cool:

Cheers
Mike

Barry Robertson

Re: December "step by step" fly tying competition entries
« Reply #8 on: 12/12/2009 at 00:52 »
Viva Snatcher

Hook - Fulling Mill Grub 12
Viva arse - Fl Chartreuse UTC 70 Thread
Thread   - Black UTC 70 Thread
Body   - Black seals fur Dubbed lightly
Rib   - #14 Uni Mylar pearl Tinsel
Hackle - Black Hen hackle
Cheeks - Chartreuse goose biots

Evening all  :wink
Here is a wee step by step for a viva snatcher that has being done well recently, hope you like it :z18

Tie in the chartreuse thread half way down the hook and run it round the bend until you feel like you have a large enough green tag.

Run the thread back up to where you started the tag.

Tie in the black thread behind the eye and run down until it overlaps the chartreuse thread which in turn will secure it. Trim off the chartreuse thread to the bobbin holder and return the black thread back up to behind th eye.

Catch in the mylar tinsel behind the eye.

Run the black thread down over the mylar tinsel until you reach the tag, this does not have to be tidy as you will dubb back over this.

Apply some black seals fur very lightly.

Dubb the thread and wind back up to behind the eye to form a body.

Pick a hackle and hold it beside the hook. Personally for a snatcher i like the hackle to bee just larger than the gape of the hook.

Tie in the hackle behind the eye.

Give the hackle one full turn at the head then another 4/5 even turns all the way down the body.

Use the mylar tinsel to trap the hackle in and rib back up through the hackle.

Secure the rib in behind the eye.

Trim off the waste rib and hackle.

Tie in a couple of chartreuse goose biots as cheeks.

Trim off excess biots, whip finish fly and apply some sally hansen varnish,


Jobe done.
Mix these snatchers up and try a few diff variations


Tight lines ,
Baz :z18

Mike Barrio

Re: December "step by step" fly tying competition entries
« Reply #9 on: 12/12/2009 at 01:16 »
Nice "SBS" Baz ........ Thanks for posting :z16

Black and lime flies always seem to do well  :wink

Best wishes
Mike

Sandy Nelson

Re: December "step by step" fly tying competition entries
« Reply #10 on: 12/12/2009 at 13:14 »
Baz

I like it :z16 yons a nice wee fly. :z12

Sandy

Irvine Ross

Damsel Nymph
« Reply #11 on: 14/12/2009 at 19:22 »
Damsel Nymph

Dressing
Hook: Kamasan B175  #14
Thread : brown 8/0
Underbody : sticky backed lead
Tail : tan grizzly marabou
Thorax : Partridge SLF Finesse dubbing No 13 Perla
Eyes : 30lb mono
Legs : tan Spanflex (or any other tan coloured rubber legs)

Wind on a thin strip of sticky backed lead from the bend to 2/3 of the way to the eye.


Catch on the thread and wrap the lead to fix it in place.


Cut a short section of 30lb mono, hold in needle nosed pliers and melt both ends to form eyes.


Tie the mono in place just in front of the lead with figure of eight wraps.


Strip the fluff from the bottom half of a plume of grizzly marabou.


Tie in the marabou on top of the lead. Make one loose turn over the stalk and then pull the feather forward to trap the fibres to lie backwards before tying down.


Run the thread back to the bend and dub on a thin spindle of SLF dubbing.


Keep the dubbing spindle narrow as you will make figure of eight wraps over the base of the eyes.


Run the thread back to level with the point of the hook.


Tie in a short piece of Spanflex on the side nearest you with one loose turn. Make sure the Spanflex is sitting in the right place and then make a couple of tight turns.


Do the same on the opposite side and you should have opposing pairs of legs making an X shape when viewed from on top.


Snip off the forward leg on each side.


Run the thread forward and tie in another pair of legs this time keeping all four legs.


Fold the legs backwards and tie off behind the eyes.


Lift up the legs and trim to an equal length (about the same length as the thorax)


Job done.


Mike Barrio

Re: December "step by step" fly tying competition entries
« Reply #12 on: 14/12/2009 at 21:54 »
Hi Irvine

Thanks for another great step by step :z16

Cheers
Mike

Iain Goolager

Re: December "step by step" fly tying competition entries
« Reply #13 on: 14/12/2009 at 23:13 »
Klink 4 Dink
Hook:       Kamasan B100 Size 16
Thread:      Orvis  12/0 Black
Wing Post:   Yellow, Pink  & Grey Aero
Hackle:      Hareline Grizzly Brown Genetic
Thorax:    Peacock Herl
Body:      Black Fly –Rite Poly Dubbing
Rib:      Fine Holographic Tinsel

1.   Place hook in vise and lay on 6 or so turns of thread where the wing will sit. Trim Tag of thread.

2.   Select a suitable amount of colour/s required for wing material – here I’ve used Yellow, Grey & Pink. Use both hands to hold the wing fibres at either end and offer it up to the hanging tying thread.  Catch the tying thread at the middle of the wing fibres and continue to pull the fibres up around the back of & then onto the top of the hook.

3.   Secure the wing material to the top of the hook using alternate cross securing wraps. A horizontal binding wrap can be used to keep the wing fibres tighter together.
 
4.   Select a suitable hackle feather and strip away a section of fibres. Note that the hackle should be oriented so as to eventually wind down the wing post with the fibres arcing upwards (concave appearance). Use 2 turns to secure stem in front of wing. Use 1 turn to secure stem behind wing. Lift hackle upright and lay alongside wing material , lay 1 wrap behind bent hackle stem to form a ‘stop’ and then begin to wrap the thread up the wing and hackle to form a wing post.
 
5.   Trim Hackle stem from front of eye. Tie in the rib of Holographic tinsel behind the wing and use touching wraps to bring it to the point where you want to start the body around the bend of the hook.

6.   Dub on a small amount of Black Poly Rite Dubbing and wind all the way back to the thorax area. Tie off Dubbing material and wind the rib in suitable turns up to the thorax. Tie off and trim. Note that the camera flash has given the effect of a poorly wound rib but as you will see later it is in fact a trick of the light.

7.   Select suitable number of Peacock Herl fibres (I’m using one due to the size of the hook and I will strengthen this with a drop of Fly-Tite cement prior to winding it on). Trim excess.

8.   Reposition the hook in the vise so that the wing is sitting horizontally, this will make both winding and tying off the hackle easier. I have opted to secure the tying thread with one whip but I could have easily prevented it from unravelling during this process by winding it up and behind the post.

9.   Wind the hackle in close turns down the wing post with as many turns as you see fit, I like 5-6 turns regardless of fly size. Note that the wing material has the job of keeping the fly afloat not the amount of hackle which as previously stated is supposed to lie in a concave manner.

10.   Tie off the hackle around the base of the post and trim waste. Twist wing material and trim to length. Add a drop of Fly-Tite at the base of the post for an absolutely indestructible fly. Tidy up any stray hackle fibres and prepare to rise Trout


Iain


Mike Barrio

Re: December "step by step" fly tying competition entries
« Reply #14 on: 15/12/2009 at 01:00 »
Hi Iain

Thanks for another great step by step :z16

Cheers
Mike

Matt Henderson

Re: December "step by step" fly tying competition entries
« Reply #15 on: 16/12/2009 at 07:48 »
iain,

very nice mate.  I'll be trying a few of those over the winter.

cheers

Matt

Iain Goolager

Re: December "step by step" fly tying competition entries
« Reply #16 on: 16/12/2009 at 10:31 »
Hi Matt,

I'm sure every man and his dog has their own prefered method for tying these type of flies, for example tying the wing material in along the spine of  hook shank and then lifting it upright before securing. OR bringing the wing material up perpendicular to the hook shank from below and folding around the shank prior to securing.

There are also various methods for tying in the hackle & tying off.
It's just a case of trying whichever method suits you. Using Fly-Tite, I find protects the vulnerable herl thorax and also is 100% guarenteed to prevent any unfurling of the parachute hackle no matter how much fish chomp it.

Easy to tie, great on their own or as a thingummyjigger.
Hook choice is also varied but I seldom use anything other than B100's in size 14 & 16 for my normal fishing, pity they dont do 18's! Anything smaller is usually tied not as an indicator but as an emerging beast. I still like the niche living larvae hooks which require bending but I'm too lazy even to do this.

Iain

Matt Henderson

Re: December "step by step" fly tying competition entries
« Reply #17 on: 16/12/2009 at 14:39 »
i've tried a few like that before but always struggled getting the hackle in place.  But I've always tried using a cdc feather rather than a normal hackle, I'll try that first and then work up to the cdc.

cheers

matt

Irvine Ross

Re: December "step by step" fly tying competition entries
« Reply #18 on: 16/12/2009 at 14:50 »
Matt

Forget the cdc when tying parachute hackles. It is too soft a feather to make a decent job. Also you need a decent bunch of it to provide floatation, a single wound hackle does not do very much. Anyway it is pointless using cdc on a Klinkhammer as you get all the buoyancy you need if you use Tiemco Aero Wing or siliconised polypropylene for the wing post.

Irvine


Iain Goolager

Re: December "step by step" fly tying competition entries
« Reply #19 on: 16/12/2009 at 15:17 »
Hi Matt,

do you try to wind the CDC as a conventional hackle or do you 'Dub' it onto/ between the thread? if you get my drift.

Iain Goolager

Re: December "step by step" fly tying competition entries
« Reply #20 on: 16/12/2009 at 15:23 »
Hi Irvine,

I don't want to tread on anyones toes but I've heard that CDC fibres (wet or dry) on such a fly add to the appeal from below. I have only tied one parachute style fly with CDC (dexterity not as good as one wishes) but am really keen to give them a go next season.

Anyone else use this as an alternative to standard hackles.

Iain

Irvine Ross

Re: December "step by step" fly tying competition entries
« Reply #21 on: 16/12/2009 at 18:43 »
Hi Ian

Tread away, my toes can take it :grin

Yes I have heard the theory. That is the idea behind the cdc & elk hair caddis pattern but all the buoyancy and shape comes from the elk hair. The cdc just gives it some movement (as would marabou?).  :z8

I have not heard/read any reports that says cdc makes a Klinkhammer more effective so, until I do, I don't think the extra faff would be worth the effort. Given the pattern has been around for a decade or more, someone must have tried it by now.

If you want to tie a few and run side by side trials next season I will be keen to hear your results. Anyway I wouldn’t advise it to anyone who has not turned out a few standard Klinkies first.

I have to hold my hand up and say I am not a great fan of cdc. You have to change your flies too often. I prefer synthetic wing material or deer/elk hair. They stay afloat longer. :z16

I liked your SBS. I am stuck with habit and follow the original pattern and tie the wing material down the spine of the hook. It gets more buoyant material into the pattern I think.

Cheers

Irvine

Ben Dixon

Re: December "step by step" fly tying competition entries
« Reply #22 on: 17/12/2009 at 00:25 »
I'm with Irvine on this one.  CDC is great until you catch a fish, then to all intents it is goosed.  A Klink is a time consuming fly to tie even when you are in th groove and tying a few.  If used for F fly wings or shuttlecocks then it can be Amadou'd after a wash and refloated, wound as a Klink hackle would be a pain at the tying stage and tehn even more of a pain once used.  I tend to tie a few specific patterns with CDC that I will use only when targeting seen large fish on smooth glides where you have maybe only asingle shot at a big fish, places where presentation is everything.  On those flies the CDC is tied as a wing, the bulk of it slows the flies fall & makes it land gently hence not upsetting calm water, only reason I use it.

For Klinks, I use TMC Aero Dry Wing (nothing better as is less dense than water) and then use any sort of sensible hackle I pick up.  Don't feel the need to use top quality genetic hacke for Klinks unless I am tying specifically as indicators or for fast water as the surface area of the hackle will usually ensure that they stay on the top.  Waterlogged CDC is one of the best fly sinkants I know!!

Cheers

Ben

Barry Robertson

Re: December "step by step" fly tying competition entries
« Reply #23 on: 18/12/2009 at 22:56 »
A couple of nice flies there chaps!
Will have to make a start to my dry box very soon, nice style of Klink anyway Iain  :z18

Sandy Nelson

Re: December "step by step" fly tying competition entries
« Reply #24 on: 26/12/2009 at 13:51 »
Just for fun :z16

I've been doing an SBS for the Openshaws Ghost fly I mentioned elsewhere. Its a simple tie and very effective.
Some good techniques too, that can be adapted for either UK salt, Pike or perhaps other baitfish patterns :z18

Hook: Gamakatsu 3/0 (don't know the number it was written in chinese :shock)
Thread: White flat mono thread
Throat: Red DnA Holofusion
Wing: White Slinky fiber
Overwing: Tan EP Fibres
Eyes: 1/2" 3D eyes

Step 1. Put hook in vice at a slight angle.


Step 2. Wind on thread just cover the first 1/3 of the shank


Step 3. Take a smallish bunch of Holofusion and tie in at the mid point.


Step 4. Fold the fibres back and tie down (approx 1/3 rd of the area covered by the thread), trim to length of the hook.


Step 5. Take some slinky fibers, the whole length of the hank. Look at the amount you think is correct and then use 1/3rd (about 20-25 fibres) Tie in with approx 2/5ths extending backwards and butting up to the hump created by the holofusion tie in. tie it down over 1/2 of the remaining gap to eye.


Step 6. Fold the fibers back and tie down.


Step 7. Take a length of EP Fibres (full length of hank) aprrox 1/3 rd of the amount of Slinky (7-10 fibres) and tie down in the remaining space to eye.


Step 8. Fold back and tie down up to where the hump formed by the slinky is


Step 9. Whip finish and trim wing to shape.


Step 10. Remove fly from vice and put on a flat surface brush wing out to desired shape with fingers , get two eyes ready and turn upside down. Mix up some epoxy.
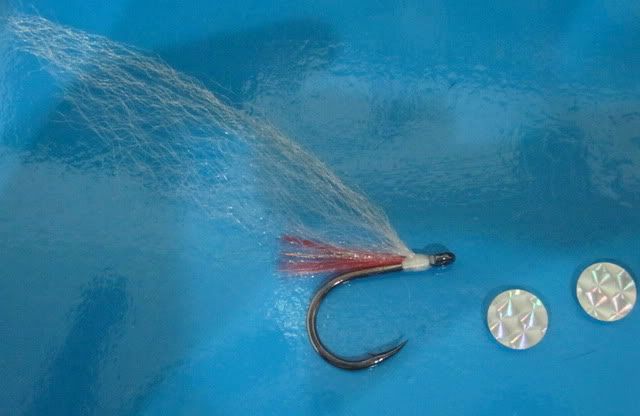


Step 11. Apply a good blob of epoxy to the back of each eye, position one eye on one side as shown (Apologies for the crap picture i had one shot at it due to 5 min epoxy curing fast)


Step 12. Mount the other eye on the opposite side.


Step 13. Press eyes together until a small amount of epoxy squeezes out of the sides, apply some epoxy to the exposed thread for a head and mount in a fly drier (don't switch it on) you may have to squeeze them together a couple of times. Make sure you straighten the fly on the hook before it sets :z16


Step 14. Once dry (very soon) the wing will retain its shape and density to look very transparent. It will be light and easy to cast.


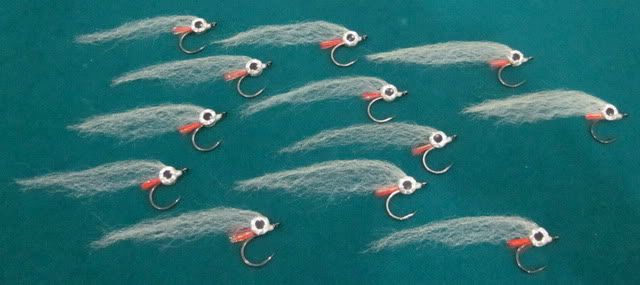
Here are the ones i have tied up for a flyswap. Its an Australian pattern although i have modified it slightly to make it more me :z7


here are the same flies going for a we swim as a shoal :z4 If you half close your eyes its really effective :z16


Cheers

Sandy


Barrio Fly Lines - designed in Scotland - Cast with confidence all over the world

Barrio Fly Lines

Designed in Scotland

Manufactured in the UK

Cast with confidence all over the world

www.flylineshop.com